Got some last minute shopping to do? Go check out BrittanyBowerDesigns.com and use code Jolly10 for 10% of your full order of wreaths and centerpieces, including sale items!


Got some last minute shopping to do? Go check out BrittanyBowerDesigns.com and use code Jolly10 for 10% of your full order of wreaths and centerpieces, including sale items!

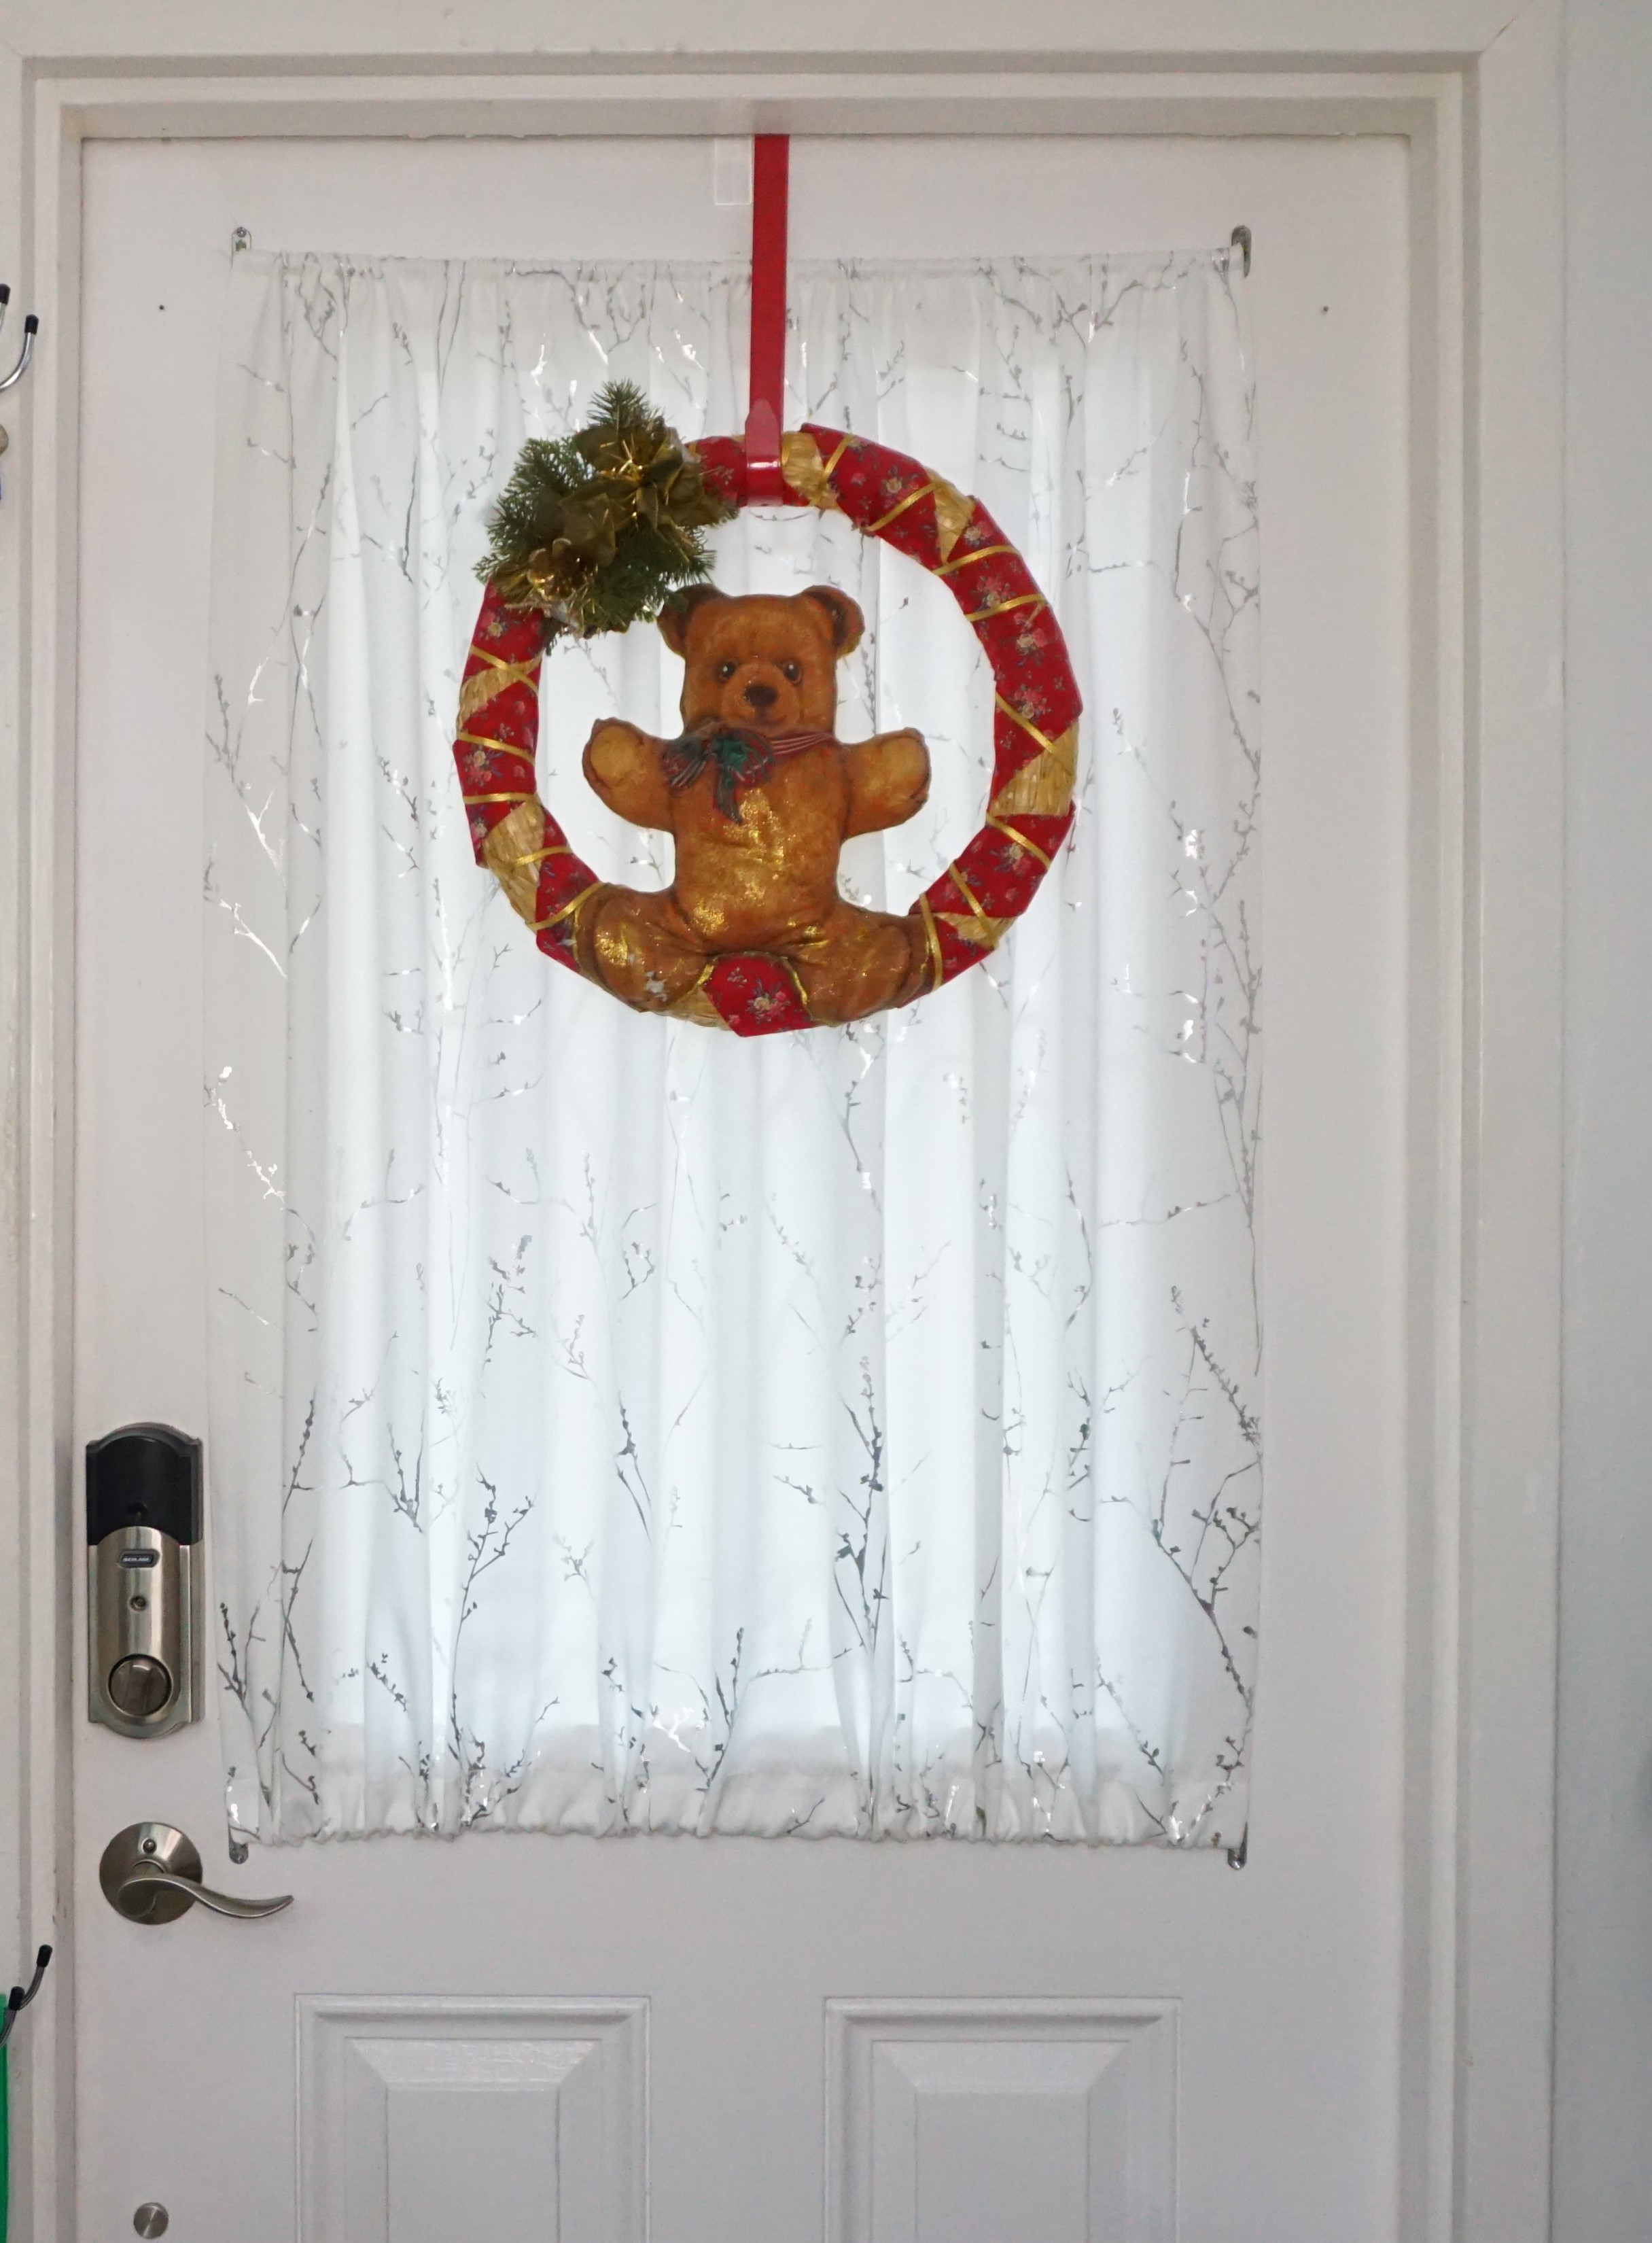
Check out the latest addition to BrittanyBowerDesigns.com, and just in time for Christmas! A straw wreath is wrapped in Christmas ribbons and then adorned with red and white glitter accented poinsettias. Green leaves create the traditional colors and silver pines add the final touches.


Growing up, kitchen towels were not just a tool for drying your hands or the dishes, but also decoration. They were used to convey a theme and make the room seem cheerier, like the strawberries in my grandmother’s kitchen. And since a kitchen can only be decorated in certain ways and places due to fear of getting messy with food, I always liked the idea. And so I have done the same with ours.
But this tended to cause a disagreement between between my husband and I, silly as it is. For me, the current towel in use should reside hanging from the cabinet handles in the kitchen, while my husband likes to keep it out on the counter instead, even after he is done, leaving me to assume that it is dirty, and for him to then question where it is has gone.
But he did have a point – hanging the towels from the cabinet handles blocks the drawers below. So I challenged him to find us an alternative and he has finally delivered, a new type of towel hook that we can keep on the side of the cabinet instead of the front. And they’re super easy to install!
We first questioned how well they would stand up, considering how reasonably priced they are, but after 3 weeks of using the new hooks, I must say I’m impressed. I regularly dry my hands without removing the towels, and they’ve managed just fine.

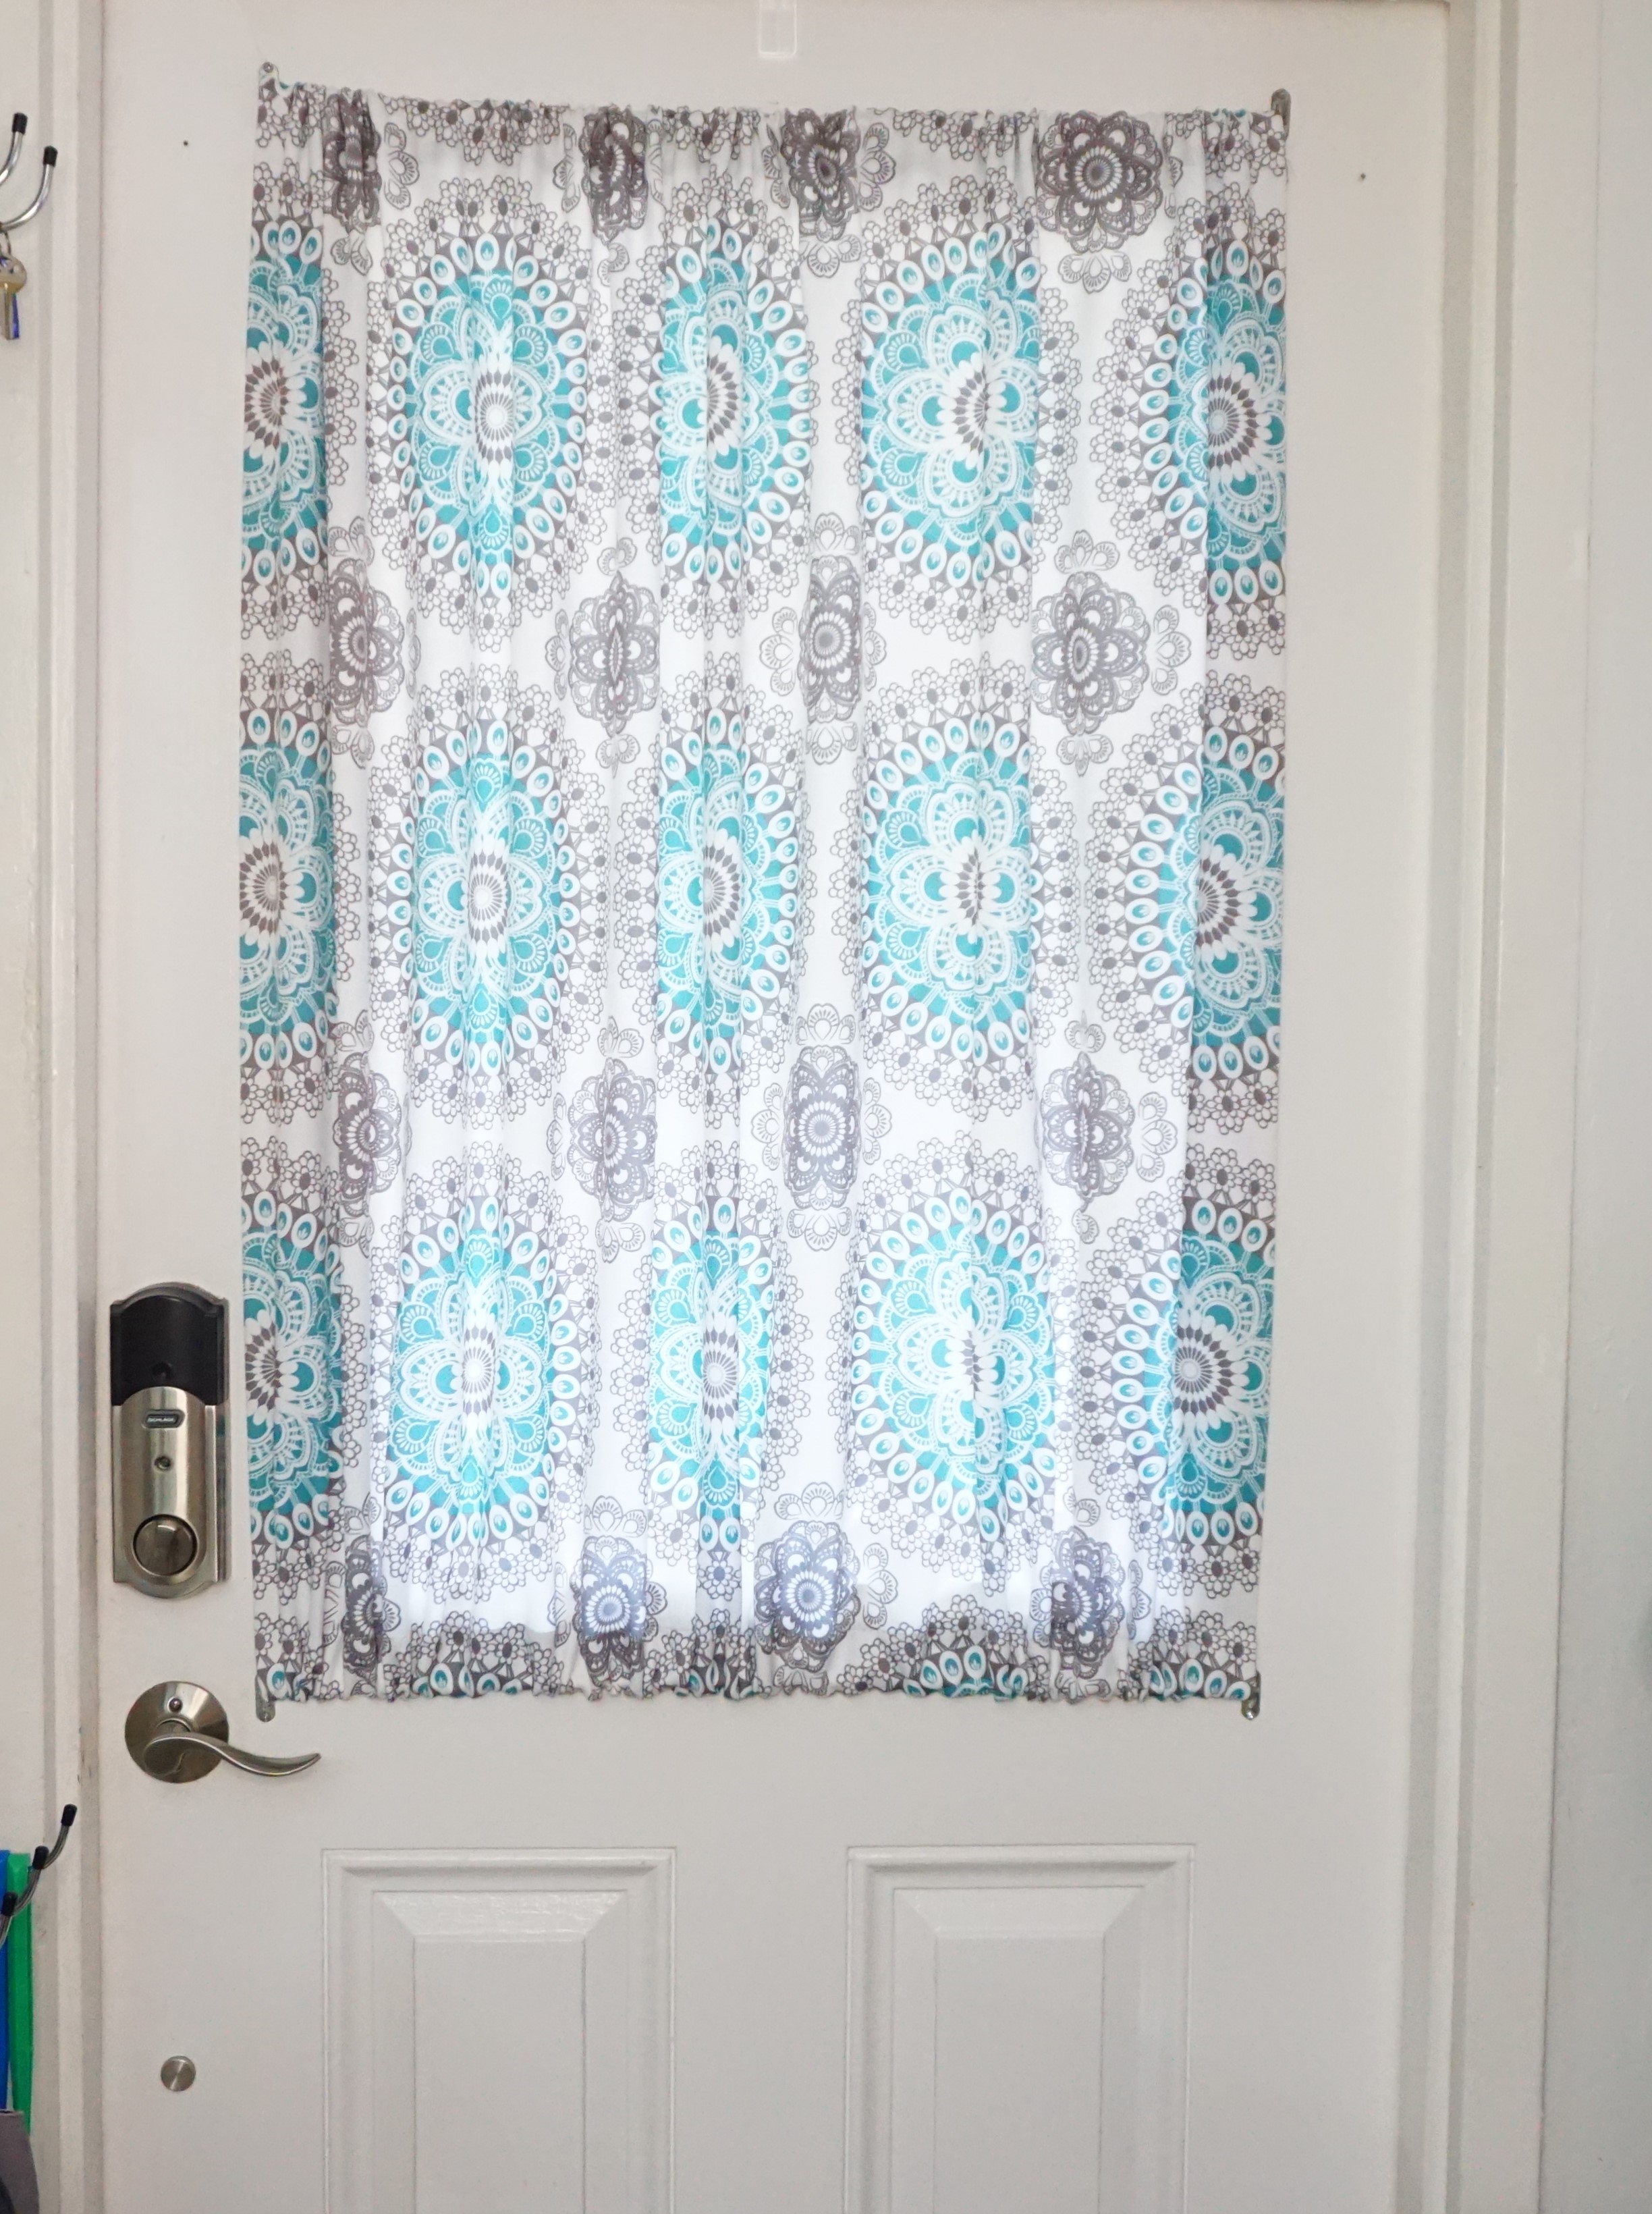
Anyone who truly knows me knows that Christmas is my favorite holiday! And while I wanted to jump on the band wagon with everyone else who has already started decorating, my husband and I have an agreement to get through one holiday before focusing on the next. I’m not judging anyone getting a head start, (especially since I’ve been ready for Christmas since July!) this is just what we do. But, those who enjoy decorating know that it takes time to get everything ready, and if you wait until Thanksgiving to start decorating, you may miss your chance to pick up any of the decorations you may not have already thought of. And this is an even bigger ordeal if there’s anything that needs to be replaced or customized, which is the case for us this year.
When we moved into our house, I had a color scheme in mind for our living room, but it still took me two years to bring it to life. I wanted a pattern for the curtains, but trying to find one to fit the color scheme and that wasn’t too crazy for traditional me proved challenging. Now that I have them, I have no intention of replacing them anytime soon, but they just don’t go with our Christmas décor and it started to wear on me last Christmas.
So I picked out new ones for the holiday season at the beginning of November and then took the rest of November to alter. Where does the time go!


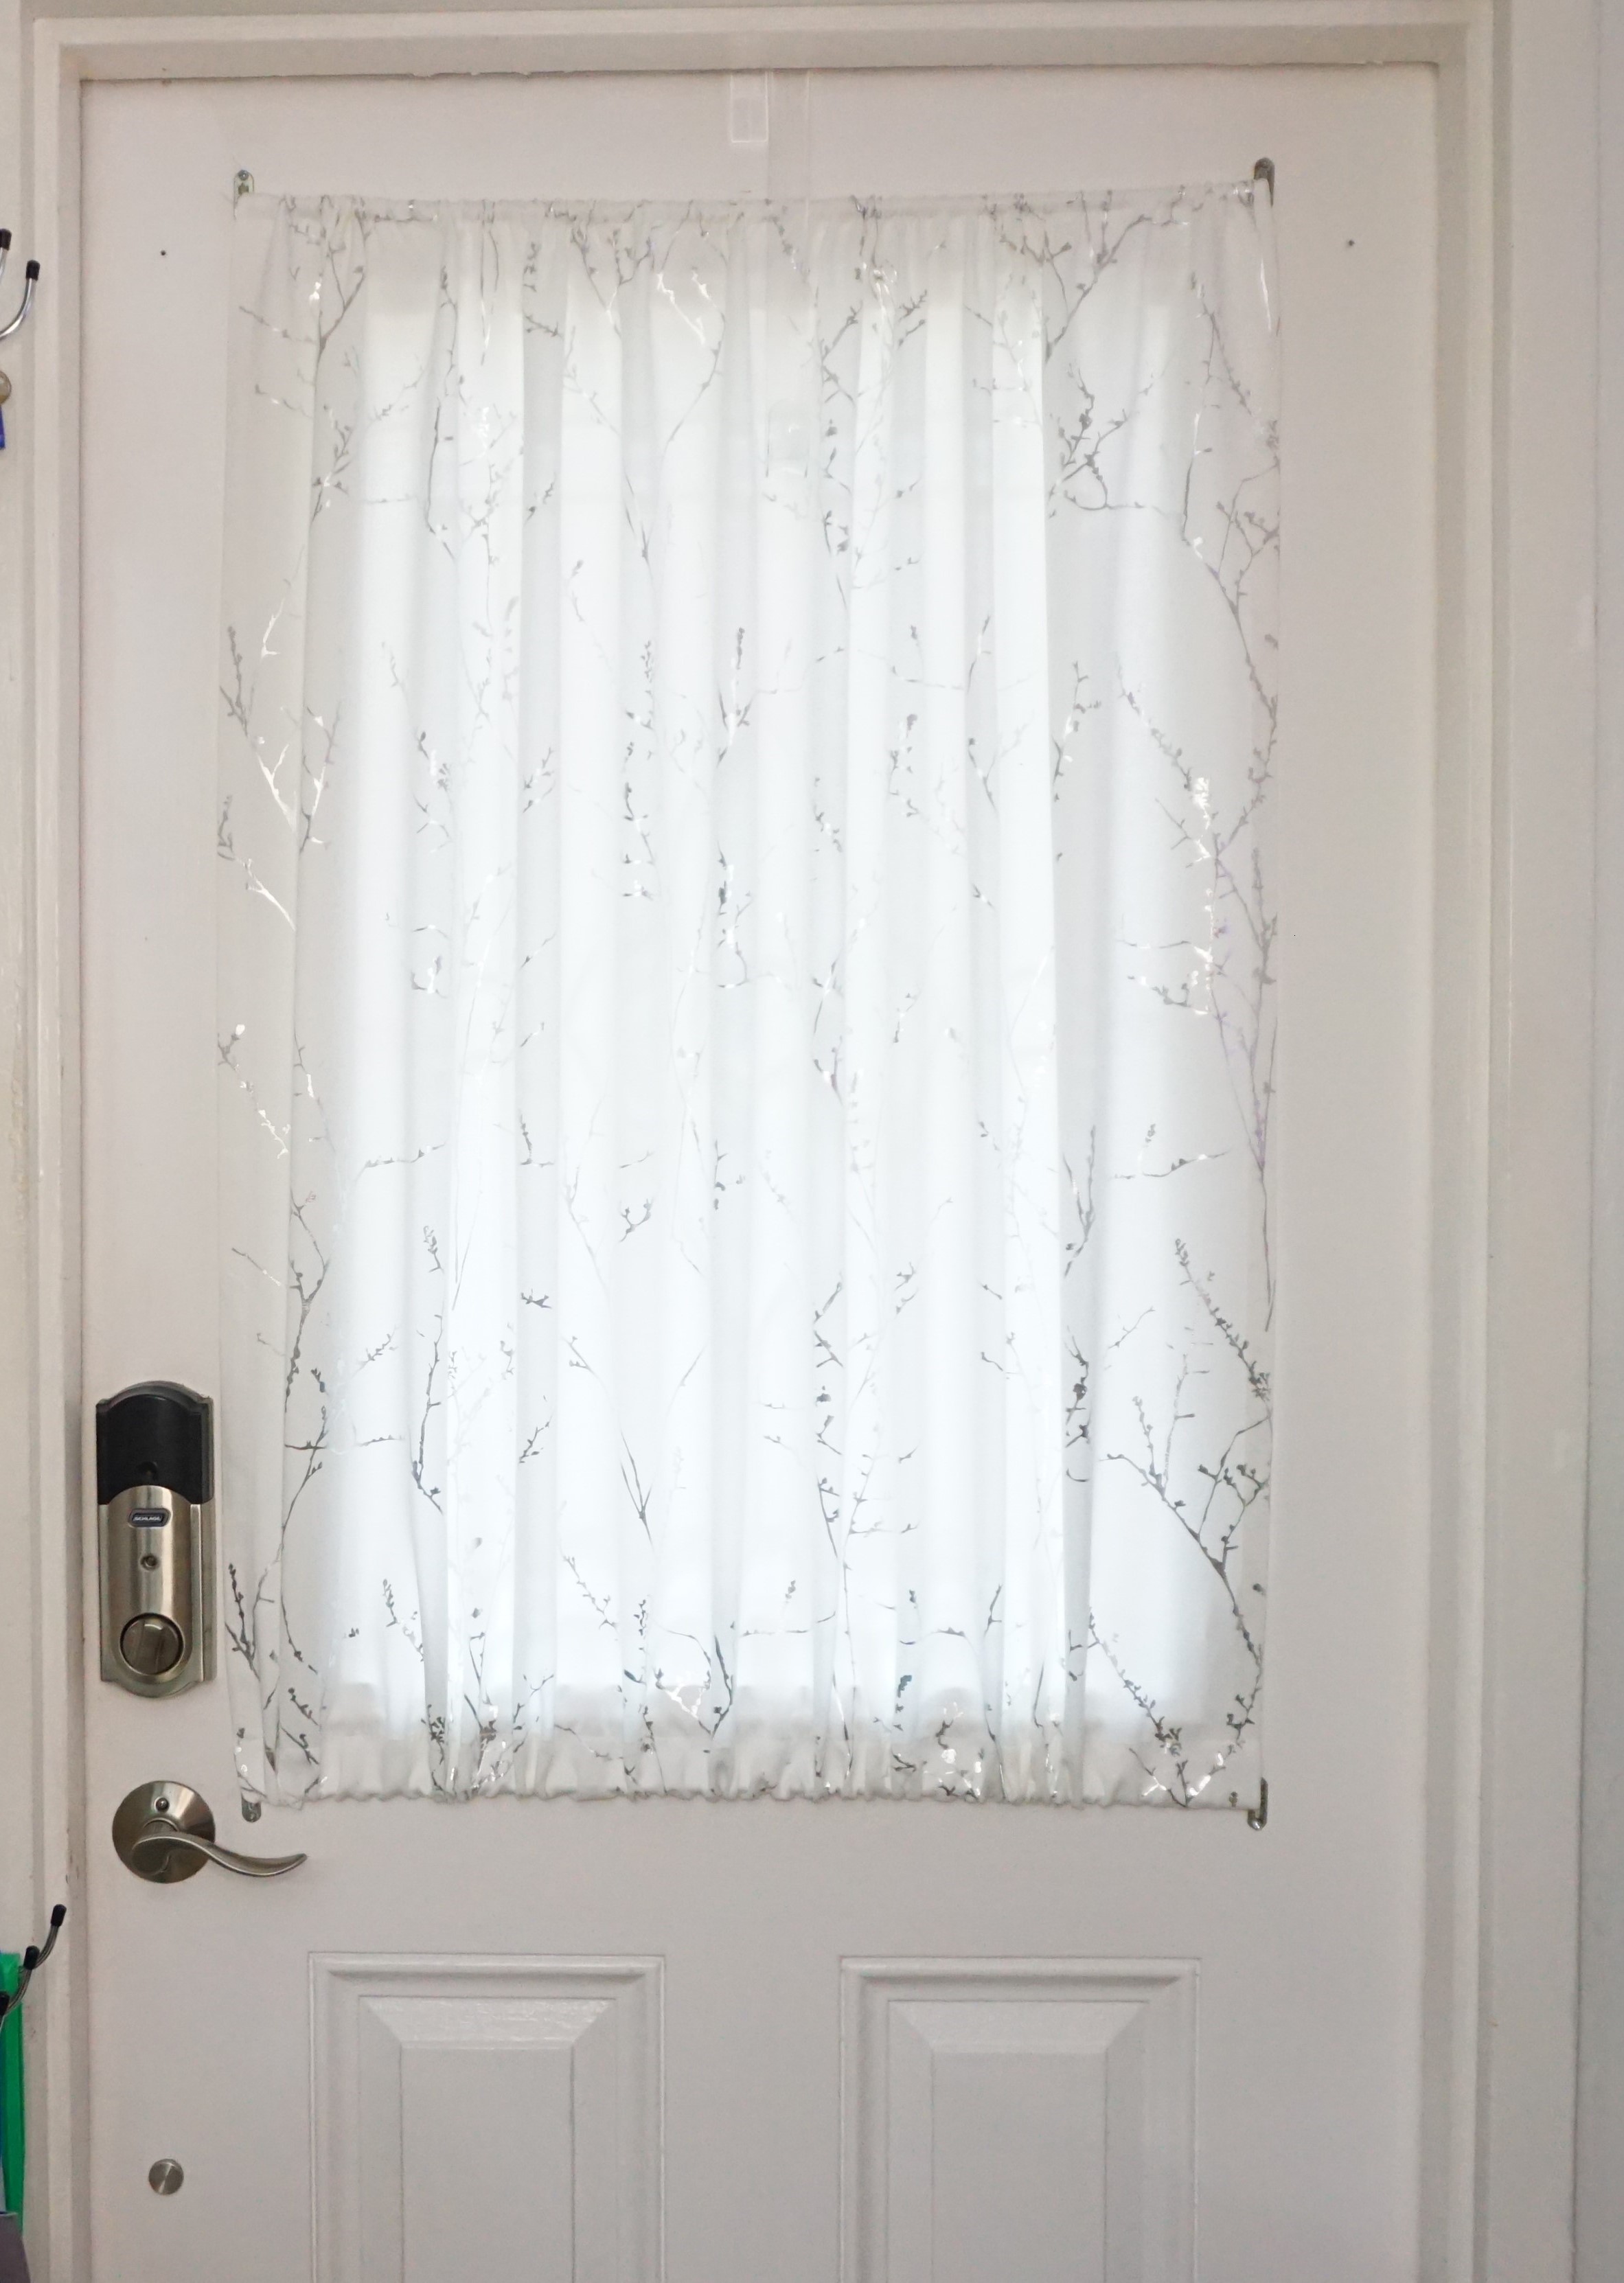
I didn’t like any options I found for an alternative valance, but Chris suggested a garland, and I think it was a brilliant idea!


This post may contain affiliate links, meaning I earn a small commission at no cost to you! When you purchase through the links provided, you will be supporting Brittany Bower and helping to bring new content to the site!

Free Shipping at BrittanyBowerDesigns.com when you use code “BLACKFRIDAY” at checkout, now through Cyber Monday!


It’s been a busy few weeks for me and it’d be fair to say that the holiday hustle and bustle has begun. But in the midst of it, I was finally able to get this lovely addition to my collection completed. Layers of yellow deco mesh create a sunflower wreath with green petals and contrast beautifully against the brown satin ribbon bow center. Check it out at BrittanyBowerDesigns.com.


With all of the pool’s guts removed it was time to start research and buying everything that we now needed to replace.


We did some research on the liner and found out that it was a unibead style liner, which is supposed to be one of the most secure, but not easiest to install or replace. We measured the pool, and kept coming up with odd measurements that included an extra 1/2″ or 3/4″, but after extensive research and getting familiar with how pool sizes run, we finally felt confident enough to order the liner. The size of our pool limited our options for liner designs with Chris initially only showing me two, neither of which I was totally psyched about. But when he went back to the results, there was a third which I loved and so we ordered it.
I don’t know if it was an option or if he thought about it for the liner, but when it came to ordering the floor liner, wall foam, and cove, we compared prices on Amazon, and thank goodness! We saved at least $200. And then it was a waiting game, as the website for the liner didn’t actually say when to expect delivery.
So while we waited for those things, Chris did research on how to address the giant rusted out holes in the side of the walls. He knew we could address the rust itself with a type of spray paint he’d used in the past, but went to YouTube for advice with patching the hole. Eventually he found that he could use sheet metal with pop rivets. Those things we could get local, so we got to work.
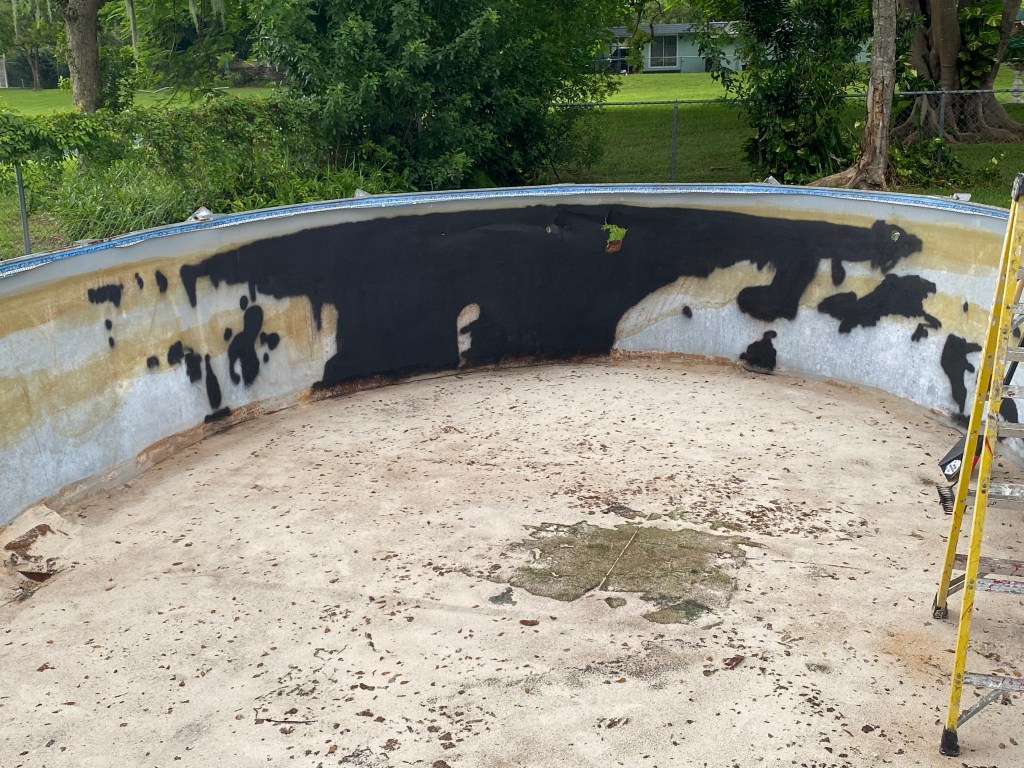

He sprayed the major rusted areas inside and out of the pool with Rust-oleum’s Rust Reformer in effort to stop the rust from getting any worse.
And then it was time to cut sheet metal and grind the edges to take off any sharp edges that could possibly scratch the liner once it was installed. And then we connected the sheetmetal to the side of the pool wall with pop rivets. And let me tell ya, using that pop rivet gun is no joke!
Now for everything else to show up and then the real work begins.
This post may contain affiliate links, meaning I earn a small commission at no cost to you! When you purchase through the links provided, you will be supporting Brittany Bower and helping to bring new content to the site!

I was looking back at old posts last week and was shocked by how much Chris and I have grown up since moving into our house. Is that still a thing even after you’re considered an adult? But I had previously cleaned out what was the Craft Room and put my touch on it, turning the room PINK and deciding to keep a lot of the previous clutter out. And now it has transformed again.
He also decided to buy himself an official drum set (he’d been learning on a set of electronic ones), so I decided to upgrade my desk which transformed the entire room with a u-shape desk, bookcases and file cabinets. And with the white furniture, you can really see how light and bright the room turned out! It’s been nice having a place for my computer and to do crafting, with more organization, and room to display all of my keepsakes, like the flowers and cloche display from our wedding. And even a designated place for my official work, without too much adjustment.
I mentioned that I started working from home at the end of last year, but that wasn’t even the catalyst for it. After our wedding in April, Chris decided to repurpose half of the rooms in our house. Our previous gym became a music studio/theater room, my previous office took on a storage role (the main thing our house is severely lacking) and the Craft Room became my new office.

When I started working from home, we really took a closer look at what that would look like. I had office jobs before, but they usually at least allow for opportunities to get up and go for a walk, usually for meetings – but mine were all online now which meant more sitting and less moving. We invested in what we thought would be a decent chair and a riser for my desk so I would at least have the option to stand.
The flexibility with the riser is nice, and it’s super easy to use since it is motorized. But I didn’t think how it might effect things when I am just sitting, which I’ve done more than I initially thought I would. At my previous job, I ended up developing an issue with my shoulder and figured out that it was because my desk was too high compared to my chair making me type with my shoulders shrugged all day. And the riser was starting to have the same effect since it raised my keyboard another couple of inches off my desk even at its lowest.
My chair was also starting to tilt to one side and it allows me slouch too much. So it’s now time for another change – I’m going to try it without the riser and trying out a new chair! We’ll see how it goes.
And for those keeping track of puppy status, the cords under my desk have now been tidied.
This post may contain affiliate links, meaning I earn a small commission at no cost to you! When you purchase through the links provided, you will be supporting Brittany Bower and helping to bring new content to the site!
Last month, Chris came into my office and showed me a video – our pool had a major leak! He didn’t know if it was from the liner or if a pipe had busted, so he went diving in the pool to find out.
Right inside from the leak he a found a tear in the liner. So, he grabbed the glue and extra vinyl (we had patched a hole last year), and went to trying to do the repair, but as soon as he touched it, it tore even more. And we realized this was not going to be an easy repair.
We already knew we were on borrowed time with the pool once we found a rusted spot at the far end after dismantling the previous pool deck. We just didn’t know what all would be involved with that repair – or if could even be done – but knew that the liner would have to come off and it might not go back on as easy as it came off. Now would be the time to address it though since the current liner obviously had to be replaced anyways.
So Chris got to draining the pool. It was such a sad sight.
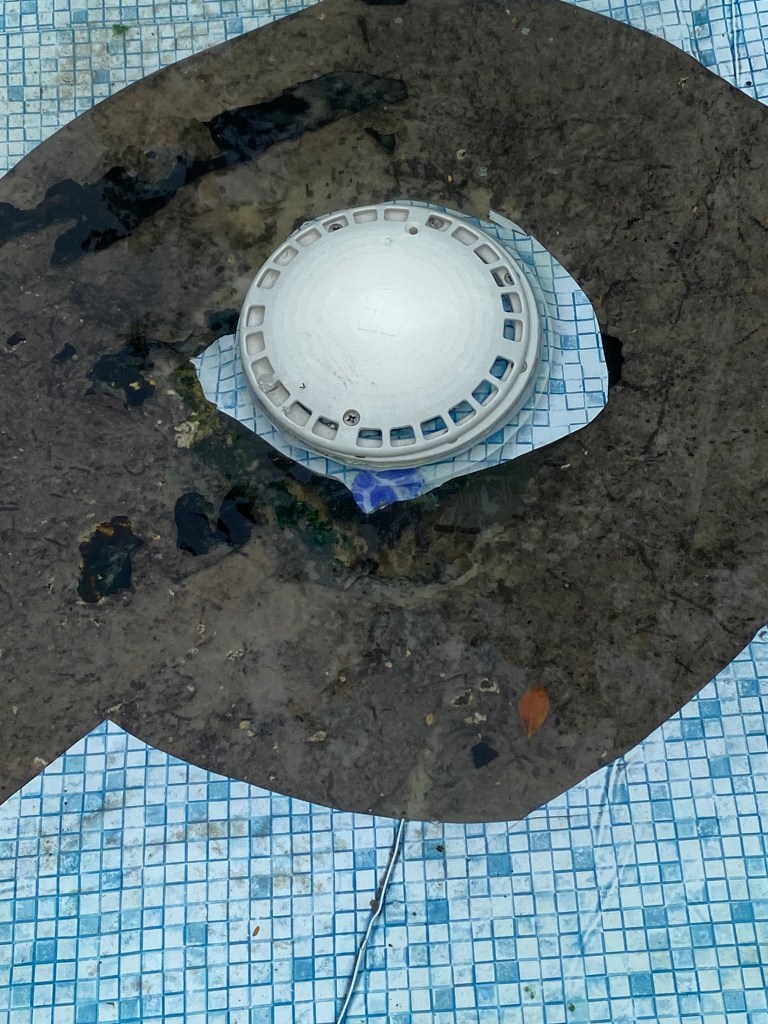
But also eye opening for all of the problems we weren’t aware of. Water pooled in a few areas so he cut the liner to allow it to finish draining disclosing the spots that had washed out. One was around the floor drain, which is what he patched last year. We couldn’t see the bottom of the hole and had no idea how far it would go, leaving us to question how we were going to fix it.

The other spot that washed out was on the inside of where he spotted the leak from the outside and was severe enough that we could clearly see some of the metal framing.
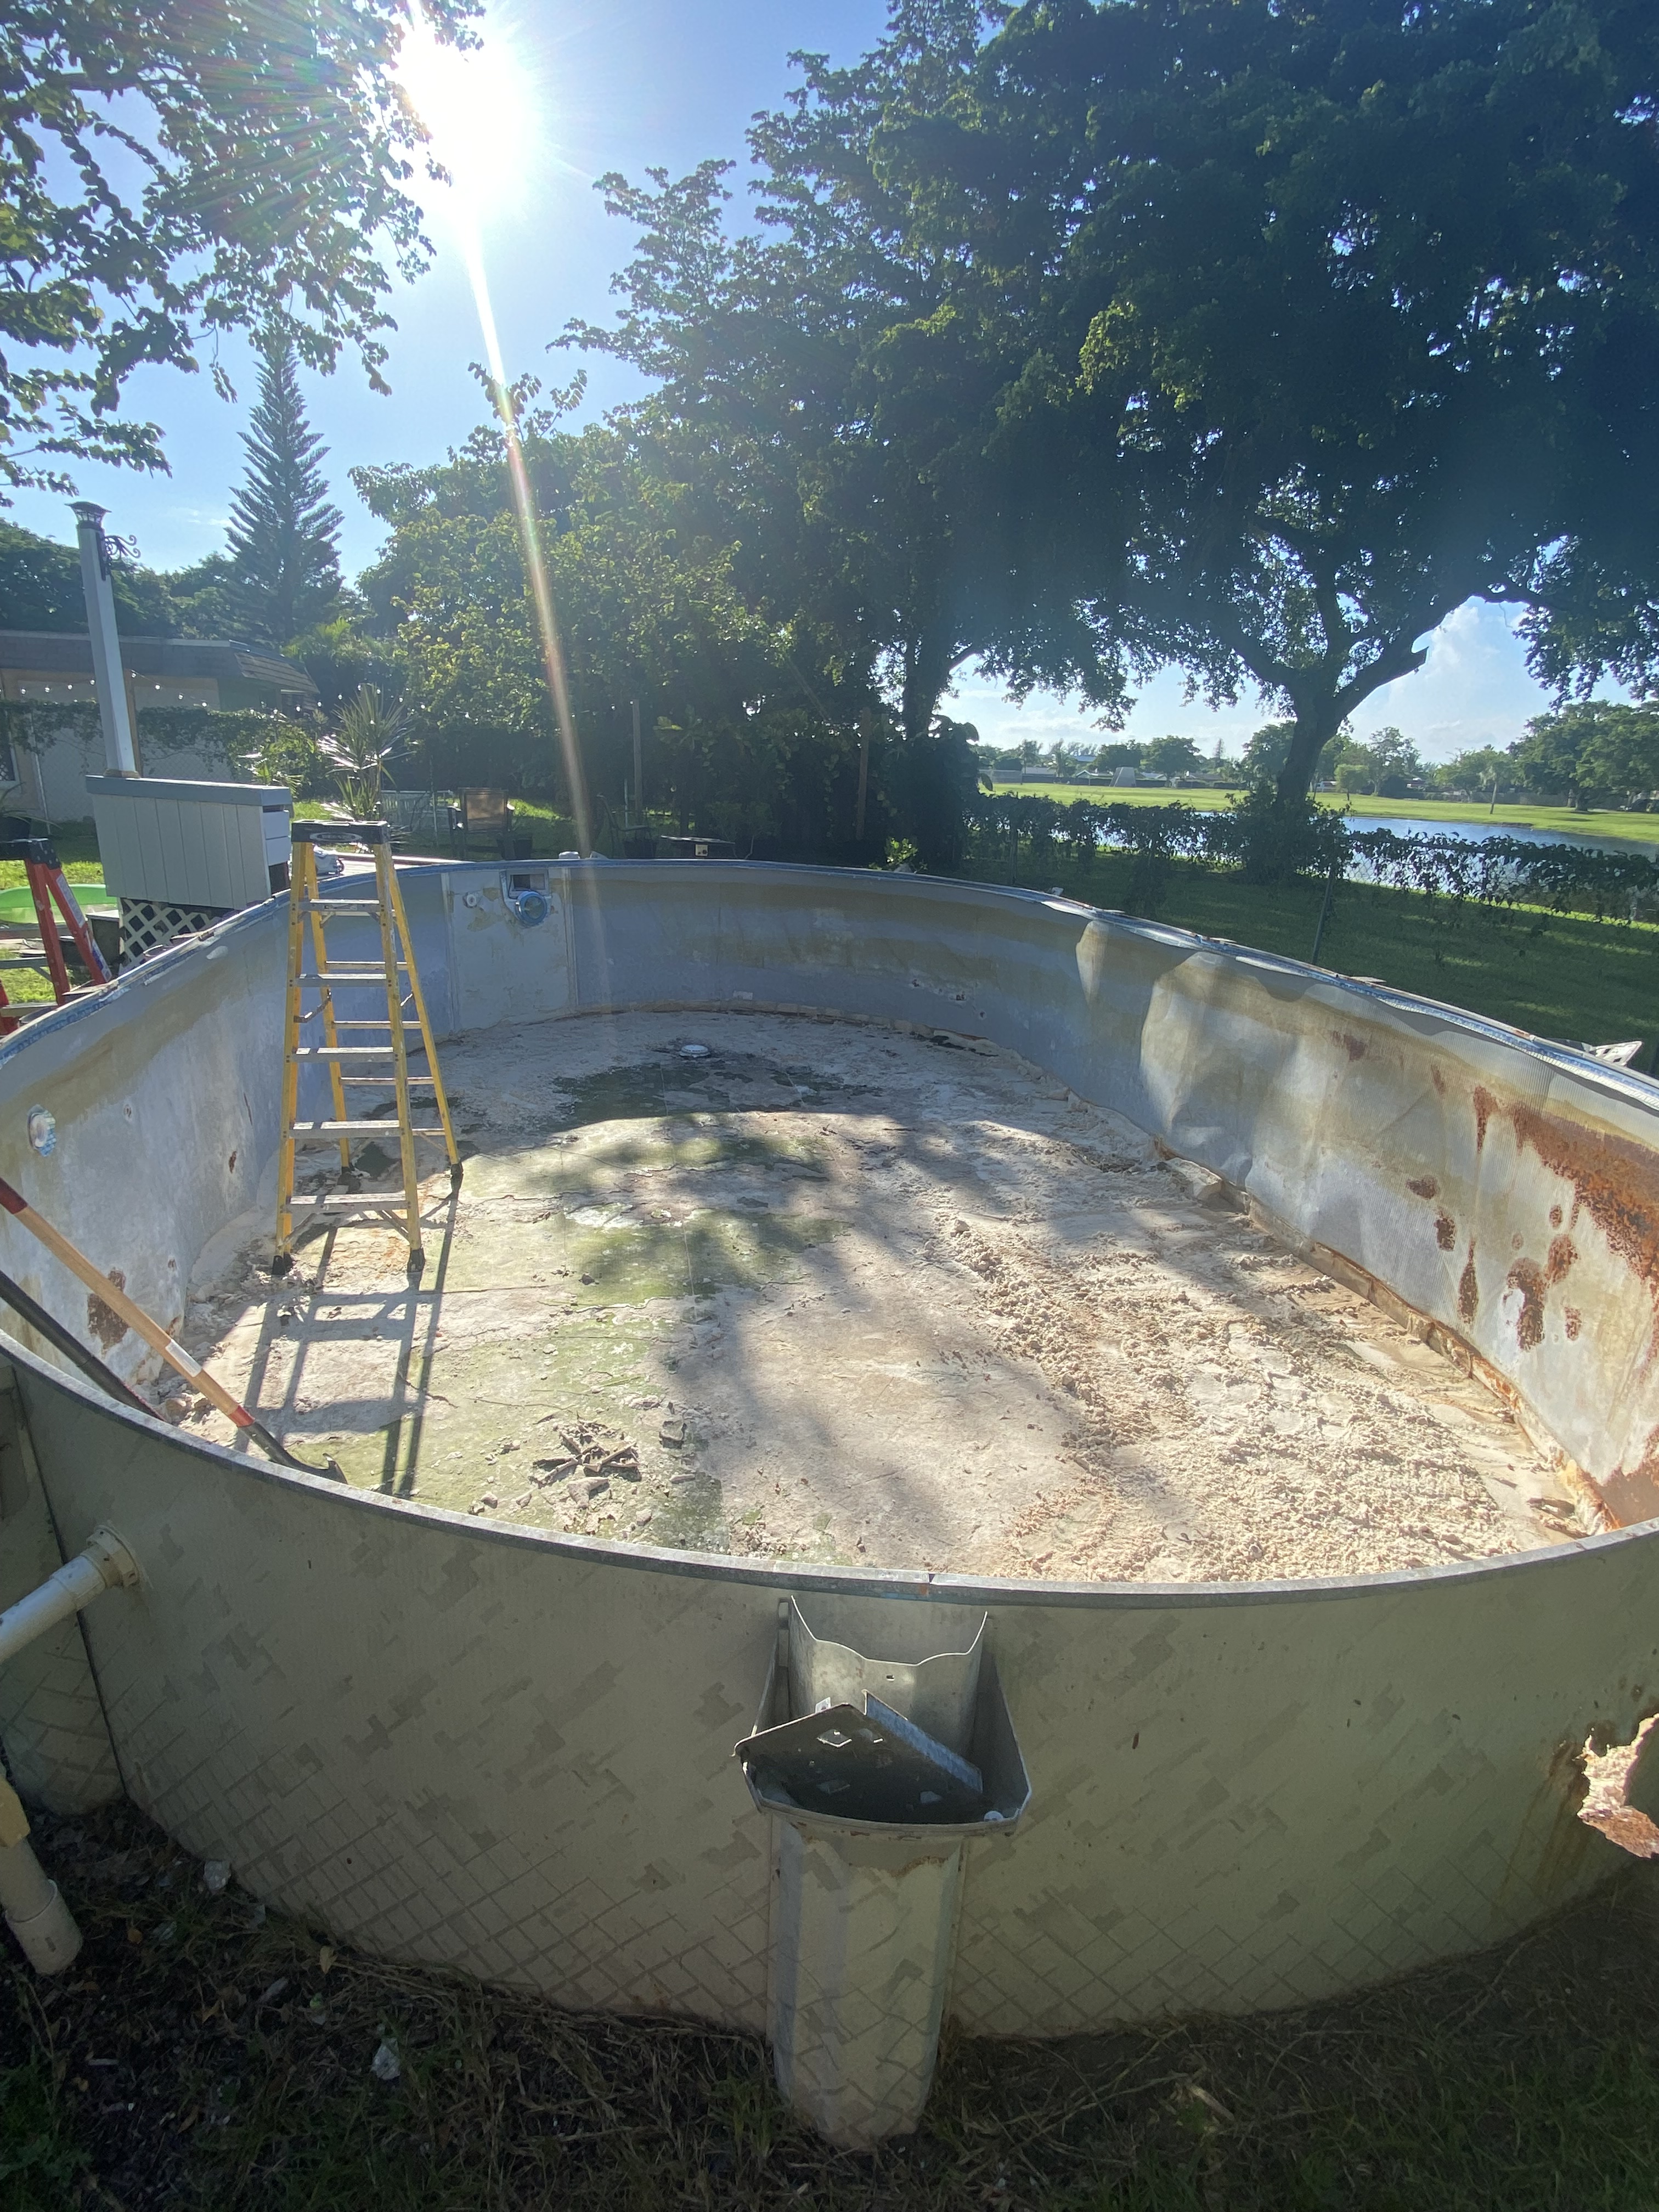
Since we’d already come this far with removing the liner, Chris decided to continue cutting down the edges in sections, revealing tears in the foam wall liner and rust spots behind large sections of it. So it came down too.
Now that basically all of the pool’s trim pieces and guts had been removed, we finally had an idea of what we were up against and it was time to start researching how to do the repairs.


